![]()
SETUP for the EasyForYou E-Shop (e-Commerce)
In this text, please replace always AAAAA with your specific code.
(After your order confirmation, You will receive a e-mail with your specific code, COD licences and a link to download the EfyEshop.exe setup)
- Start EasyForyou and click the menu File->Licence->GO
- Restart EasyForYou -> Easy prompt a message -> "New Password updated, please restart"
- Restart EasyForYou add and manage your categories, dont forget the checkbox "Show WEB"
- Start menu File->Products->Category and set the Category for each products you want to see on your e-Shop
- For Vista or Windows 7 only :
It is bether to disable UAC
To disable UAC in Vista :
Control Pannel
Select user accounts
Change security settings
unselect the "Use User Account Control (UAC)..." Reboot
B 1) Settings the E-Commerce Eshop on the shared hosting from the server facturation-facturatie.be
- If you have already a shared hosting
(ASP) and you don't like to use the server from facturation-facturatie.be
follow the instructions on B 2
-
If you want to setup your own private server IIS, follow the instrictions
on B 3
- Start EasyForYou and go to menu Tools->Parameters->Others and
input the following variables :
Login ftp :
Password ftp :
Address ftp : ftp.facturation-facturatie.be
(after buying the E-Commerce, you will receive this informations)
- Download and run once the file https://www.easy-for-you.com/download/efyEshopLocal.exe in your local folder from your c:\...\EasyNet\EasyForYou\..
- Edit initvar.inc with the notepad and setup the following variables
:
sMenuHome = "put here the URL name of your site like https://www.mysite.com"
sSender = "put here your email adress" (if you want yo active the on-line paypal payment system in the e-commerce, put here your paypal e-mail adress)
sSharedHosting = "BC1S"
sSharedURL = "https://www.facturation-facturatie.be/eshop"
sServer = "" ' (empty the SMTP adress)
- Go and read the part C) from this manual to setup the layout and backgrouds.
- Start EasyForYou and click the menu Tools->Import-Export E-Commerce to upload the database and your pictures.
- Test your ecommerce with this link https://www.facturation-facturatie.be/eshop/default.asp?user=AAAAA&lang=EN
(Replace the AAAAA with your specific code and put the language you want to start the e-commerce in &Lang=.. )
From now :
Every product, prices , categories, ... your change in your software EasyForYou is automatically updated in your all the web pages from the E-Commerce.
Every time a customer place a order in the E-Commerce, all his data and the order is availaible in the tab Orders from your software EasyForYou
B 2) Settings the E-Commerce on your shared hosting (ASP)
- If you
don't have your shared hosting follow the instructions on B
1
-
If you want to setup your own private server IIS, follow the instrictions
on B 3
- Follow and procede to all the steps from B 1
- Create a new FTP account with AAAAA
as login
(Replace the AAAAA with your specific code)
And set the same password that you receive for your database easywin.mdb (accesstomdb.txt)
(after buying the E-Commerce, you will receive this informations)
- Make a FTP connection to your hosting and :
- Upload all the ASP files from C:\Inetpub\wwwroot\include to ..//wwwroot/include (create the folder if not exist)
- Upload all the ASP files from C:\Inetpub\wwwroot\eshop to ..//wwwroot/eshop (create the folder if not exist)
- Rename the folder ..//wwwroot/eshop/users/mdbpqtcd with eshop/users/mdbAAAAA/ (Replace the AAAAA with your specific code)
- Delete the files ..//wwwroot/eshop/users/mdbAAAAA/images/bg1.gif to bg9.gif
- Delete the files ..//wwwroot/eshop/users/mdbAAAAA/images/bgbottom1.gif to bgbottom9.gif
- Delete the files ..//wwwroot/eshop/users/mdbAAAAA/easywin.mdb and easywin-ecommerce.mdb
- Delete the files ..//wwwroot/eshop/users/mdbAAAAA/*.exe (delete all the .exe extentions from the server)
- Go and read the part C) from this manual to setup the layout and backgrouds.
- Start EasyForYou and click the menu Tools->Import-Export E-Commerce to upload the database and your pictures.
- Test your ecommerce with this link https://www.The-URL-Name-Of-Your-WebSite.com/eshop/default.asp?user=AAAAA&lang=EN
(Replace the AAAAA with your specific code and put the language you want to start the e-commerce in &Lang=.. )
From now :
Every product, prices , categories, ... your change in your software EasyForYou is automatically updated in your all the web pages from the E-Commerce.
Every time a customer place a order in the E-Commerce, all his data and the order is availaible in the tab Orders from your software EasyForYou
B 3) Settings for your own IIS server (require minimum Windows 7, Vista or XP PRO or Win-2000)
- Todo ONLY If you want to setup your local server IIS for a full syncronization
-
If you don't have your shared hosting follow the instructions on B
1
- Start the setup with executing the efyEshop.exe in your c:\temp folder.
- For Vista or Windows 7 only : Execute the C:\Inetpub\wwwroot\SitesAsp\EasyForYou\site\vista.bat
- Start the second setup in C:\Inetpub\wwwroot\SitesAsp\EasyForYou\site\eshop\users\mdbpqtcd\setup.exe
- Check if IIS is working with your Explorer: Click this link https://localhost/SitesAsp/EasyForYou/site/eshop/testserver.asp
- If Ok, you will see the message Hello, the ASP work fine :-)".
If not, then refer to the Microsoft web site link https://docs.microsoft.com - Check if the includes files are visible with your Explorer: Click this link https://localhost/SitesAsp/EasyForYou/site/eshop/testinclude.asp
- Create a new folder C:\Inetpub\wwwroot\SitesAsp\EasyForYou\site\eshop\users\mdbAAAAA (dont forget to replace the AAAAA with your specific code) (respect the low case letters)
- Give the right to all the users (internet user IUSR_... also) to READ
and WRITE in this folder, for your security DON'T give the right
to DOWNLOAD or LIST this folder)
For more possibility's, in the Folder Options, desactivate (UNCHECK) the field "Use simple file sharing"
Note: Give also the right to read in the folder C:\Inetpub\wwwroot\SitesAsp\EasyForYou\site\eshop
- Copy all the files, folder and SUB-Folders from
C:\Inetpub\wwwroot\SitesAsp\EasyForYou\site\eshop\users\mdbpqtcd
to
C:\Inetpub\wwwroot\SitesAsp\EasyForYou\site\eshop\users\mdbAAAAA - MOVE and replace all the files
from
c:\program files\easy for you\*.* (or the folder from your original easyforyou software)
to
C:\Inetpub\wwwroot\SitesAsp\EasyForYou\site\eshop\users\mdbAAAAA
(Don't forget to change your shortcut to start EasyForYou to your new location) - IMPORTANT: Give the right to read and WRITE for the folder C:\Inetpub\wwwroot\SitesAsp\EasyForYou\site\eshop\users\mdbAAAAA
Click here to check if you have the rights to read and write in this folder ->
https://localhost/SitesAsp/EasyForYou/site/eshop/testrights.asp?user=AAAAA
- In all the following links, change the
user=AAAAA with your specific CODE, Try to start the Eshop with the
link
A) https://localhost/SitesAsp/easyforyou/site/eshop/testconnection.asp?user=AAAAA
If the database-test connection work fine, you will see the message
Test database: Easywin.mdb or easywin-ecommerce.mdb
Test FileLocation = c:\inetpub\wwwroot\SitesAsp\easyforyou\site\eshop\users\mdbpqtcd\easywin.mdb* TestFileExist = True*
Connection String = PROVIDER=Microsoft.Jet.OLEDB.4.0;Data Source=c:\inetpub\wwwroot\SitesAsp\easyforyou\site\eshop\users\mdbAAAAA\easywin.mdb;Jet OLEDB:Database *
Test Open OK
Test Read in Database OK
Test Write in Database OK
Test Close OK
Test database: EasyText.mdb
Test FileLocation = c:\inetpub\wwwroot\SitesAsp\easyforyou\site\eshop\users\mdbpqtcd\easytext.mdb*
TestFileExist = True*
Connection String = PROVIDER=Microsoft.Jet.OLEDB.4.0;Data Source=c:\inetpub\wwwroot\SitesAsp\easyforyou\site\eshop\users\mdbpqtcd\easytext.mdb;Jet OLEDB:Database *
Test Open OK
Test Read in Database OK
Test Close OK
Test e-commerce (in the link, select the language with lang=...FR,NL,EN,SP,DE,IT or PT)
B) https://localhost/SitesAsp/easyforyou/site/eshop/default.asp?user=AAAAA&lang=EN - To log inside the E-Shop or to place a order, take the customer reference and give a password in the software EasyForYou ->File->Cust. or Suppliers->Password
- If you place a new order in the eshop, the status from this order is CLOSED in EasyForYou, if you validate the order in the Eshop, the order change to status OPEN in Easyforyou.
- If you like, you can activate the automatic confirmation by email for
you and for your customers.
First install the free AspMail dll availaible on https://www.easy-for-you.com/download/aspemail.exe
Setup the file C:\Inetpub\wwwroot\SitesAsp\EasyForYou\site\eshop\users\mdbAAAAA\initvar.inc with a notepad.exe and at the bottom input your email (sSender) and SMTP adress (sServer)
Please check the ASPmail dll with https://localhost/SitesAsp/EasyForYou/site/eshop/testmailserver.asp?user=AAAAA (for your security, this asp is only availaible on demand)
Note: With Windows Server 2008 or W7, to view 32-bit version of ODBC Driver, you can use the C:\Windows\SysWOW64\odbcad32.exe instead.
(set ODBC service to 32 bit to work with the access database)
To see detailed ASP errors:
1) IIS -> Default Web SITE -> IIS -> ASP -> Debugging properties -> send error to browser -> True
2) IIS -> Error Pages -> 500 -> Edit Feature Settings -> set "Detailed Erros"
For MDB databases, dont forget to update or install the last jet engine https://learn.microsoft.com/en-us/office/troubleshoot/access/jet-odbc-driver-available-32-bit-version
* For Windows 2008: Navigate to Server Manager > Roles > Web Server (IIS) > Internet Information Services (IIS) Manager, then look under your machine name > Application Pool.
* For Windows 7: Navigate to Programs > Administrative Tools > Internet Information Services (IIS) Manager, then look under your machine name > Application Pool.
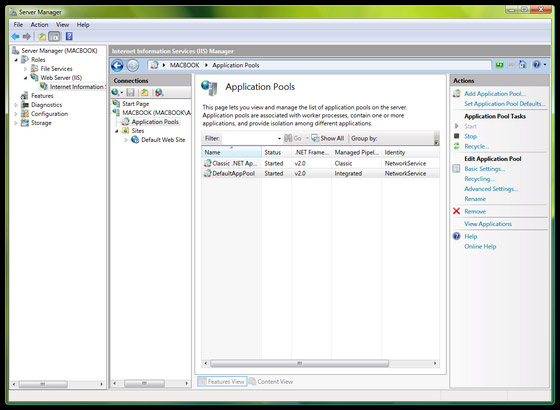
Under there you can call the DefaultAppPools advanced settings to change Enable 32-Bits Applications to True:
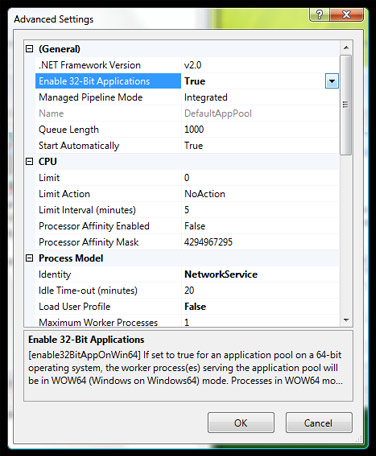
You may have to restart the service for it to take effect but it should work.
- Setup your home page in C:\Inetpub\wwwroot\SitesAsp\EasyForYou\site\eshop\users\mdbAAAAA\home.htm,
if you like different language, translate your home page and make a copy
like homeFR.htm, homeNL.htm, homeIT.htm, homeSP.htm, homeDE.htm, homeEN.htm
If you like to add images in this home.htm, use the following syntaxe :<img src='users/mdbAAAAA/images/your-image.jpg'
DO NOT add any headers tags like <html> </html> or <head> </head> or <body> </body> , this will create problems, because there exist already a head into the ASP engine.
- Check and setup your initvar.inc in "C:\Inetpub\wwwroot\SitesAsp\EasyForYou\site\eshop\users\mdbAAAAA\initvar.inc" (READ all the comments, there is a lot of possibilities to change a lot of things in your e-commerce) -> Click here to download the Example of initvar.inc
- Change the general layout and many different parameters from your in C:\Inetpub\wwwroot\SitesAsp\EasyForYou\site\eshop\users\mdbAAAAA\initvar.inc (use a notepad editor)
- Change the back-ground design from your site with the C:\Inetpub\wwwroot\SitesAsp\EasyForYou\site\eshop\users\mdbAAAAA\images\bg.gif (same than for the layout, il you like to work with one different backgroud for each different languages, please copy the bg.gif to bgFR.gif, bgNL.gif, bgEN.gif ...
- - The picture showed in the eshop can be different
than theese printed on the EFY documents, copy all your pictures in
C:\Inetpub\wwwroot\SitesAsp\EasyForYou\site\eshop\users\mdbAAAAA\images\ref-product.GIF
or ref-productJPG
- If you want to show Thumbs (small pictures), create a small picture format (about 100 to 200 pixels) and copy in the thumbs folder1
OR use the initvar.inc variable nThumbsWidthSize = 100 to define the Widh for the thumbs in pixels (When you import a picture in menu File->Produts->Picture, EFY create a thumbs from the selected size)
C:\Inetpub\wwwroot\SitesAsp\EasyForYou\site\eshop\users\mdbAAAAA\thumbs\ref-product.GIF or ref-productJPG (this will increase the speed of your e-commerce)
- The e-commere create automatically link's from the thumbs to the big picture. (click on a small picture and you see the big in a window)
- If you want to use the same picture for many differents products, in EasyForYou, menu Files->Produts->Additional fields, put a variable with the name of the picture to use with this syntax /PICT:mypicture.jpg/
- You can also illustrate your categories, same as for the products, create a picture with the REF-CATEGORIES.JPG or GIF and copy the picture to the folder C:\Inetpub\wwwroot\SitesAsp\EasyForYou\site\eshop\users\mdbAAAAA\images.
Note1 :You can also illustrate your categories with a HTML file, exactly like for the products in description chapter 6. 2)
Note2 : Use the utility ResizeJpg.exe (delivered in EFY from version 9.9.676) to resize easily resise all your pictures from the folder \images or \thumbs to a specfic pixel size (sugestion use 300 pixels width for the images folder and 100 pixels width for the thumbs folder).
- Two possibilities to include a long description for some of all
your products:
1) In Easyforyou, go to your menu File->Product and select a product. In the additional field, put a new variable including your description using this sintax :
/DES:your long description including html tags like this.<br>For carriage return.Or<b>for bold</b>....
You can also using a specific description for each different languages. In this case procede like this :
/DESFR:Pour le texte en Français./DESNL:Voor u Nederlandse omschrijving./DESEN:For your English description...
2) Second possibility, create a html file with a html editor for each description.
VERY IMPORTANT: Do not include de header tag like <html></html> or <head></head> or <body></body>
Include your text, other pictures, html tag's and so on...Copy and name this file :
C:\Inetpub\wwwroot\SitesAsp\EasyForYou\site\eshop\users\mdbAAAAA\images\ref-product.HTM
You can also have a different long description for each different languages, in this case rename the file ref-product.HTM like this : ref-productFR.HTM for French, ref-productNL.HTM for Dutch...
In case you want to insert some images, use this path : <img scr=users/mdbAAAAA/images/your-specific-image.jpg>
- If you want to use the same text for many differents products, in EasyForYou, menu Files->Produts->Additional fields, put a variable with the name like mytext.htm to use with this syntax /DES:mytext.htm or /DESFR:mytext.htm
- In the folder images, You can also change the picture caddie.gif, trash.gif, bulletmenu.gif ... with your own pictures.
- To change the coulours of the titles, text size etc.. refer to the css folder.
- You can check all the E-Shop order from inside EasyForYou, in the file->document management, in the customer research fields, if you type EFY E-Order + RIGHT click mouse (to start the advanced search menu) on the search button + Search this keyword in advanced search menu.
- Do not modify the ASP files inside the eshop
folder, if you do, the next update from EasyForYou, they will be replaced
and erased.
- Calculate and parameterise the transport cost or Shipping charges.
In the software EasyForYou
1) In menu File->Products, create or use a product with reference TRA and description : Transport cost or Shipping charges, input the prices according the customer level.
2) On the right side of the prices you can input a limit amount "Free from". If the sum of a order placed in the e-commerce is equal or higher than this amount, the shipping charges are FREE.
ADVANCED possibilities to calculate the shipment charges according the Weight and destination of your products.
1) In menu File->Products, Input the weight of your products.
2) To create a specific decreasing price for a specific destination: In your menu File->Categories, create a category named "TRA" + with the country code. For example TRAFR for shipping to France and UNCHECK the boxfield "Visible E-Shop".
3) In this category TRAFR input the description "Shipment for France" and click the plus (+) button to add a price with a weight limit from to You can use different scales like in this sample :
4) For the shipment prices to European communities, use TRAEUR as categories reference.
5) For shipment prices to the rest of the world use TRAALL as categories reference.
6) Some specific countries have different territories using the same prices levels as the "mother" countries. For example, if the shipment prices for Monaco or Andorra are the same as for France, create a category like TRAMC for Monaco and TRAAD for Andorra (MC is the country code of Monaco and AD for Andorra, all the country code are available in the table COU001)
For this example of categories (TRAMC and TRAAD), in the "category mother e-Shop", simply type or select the "mother" country reference (TRAFR) to refer for the price calculation.
- Possibilities to offer a Free product or Gifts according
the total quantity or specific amount for a product.
Possibilities to offer a Free products or Gifts with this syntax in the additional field of the Files->Products in EasyForYou :
Example for the product reference : COCA (Coke)
A) In case of working with quantities :
In the additional field of the Files->Products, put this syntax : /FREE:BIC>=100/
This mean, in a order where the total quantity or COCA is 100 or more, the customer will receive one free product (reference : 'BIC') when confirming the order.
B) In case of working with a amount :
In the additional field of the Files->Products, put this syntax : /FREE:BIC>=100EUR/
This mean, in a order where the (unit-price X quantity) total value without tax or VAT for the product COCA is 100 EUR or more, the customer will receive one free product (reference : 'BIC') when confirming the order.
- General discount for the customer
Do as follow to give a general discount regarding the total amount of the purchase.
- In Easyforyou menu->File->Categories, create a new category with reference DIS, input the description in the different languages.
- Uncheck the field "Visible E-Shop".
- Select the "Type" -> "Margin" (in this case only, we use the margin as a discount percentage)
- Click the + button to add a new line
- Input the percent discount (in the Margin field) you want to give ("from" amount "to" amount) like in this example
- To add a new line, press the key ENTER from your keyboard when the cursor is in the field "to".
- Parameters in the link : &PROMO=N ' dont show the Special offers (promotions)
- Free transport possible with total amount in fields 'by quantity' for products 'TRA'
- Using Size and Colors.
How to use the size and color system : (at least version 7.5.452)
In the e-shop:
- In the file initvar.inc, set the variable bSizeAndColors = true
(very important caution: do not use parentheses () in the products without size and colors)
In Easyforyou : Each size and colour is a separated product (needed to manage your inventory and barcodes)
- In menu Products, (as example) , create a "generic" product reference : SHOES001
- Input the description for your product: Nike - Airforce
- Only in the generic product, put /CAT:Y in the additional field
- Input the sales and purchases prices.
- Dont forget to select a Category.
- Save and click the menu "Edit->Copy"
- Click the menu "Edit->Paste New", and type the new reference : SHOES001-39-RE (use the generic reference and type your SIZE and COLOR codes separated by "-" minus, in this example, we use 39 as size and RE for red)
- As description, for example, type "Nike Air Force (39) (Red)"
Right syntax : After the description, type ONE space + Open Bracket + Size + Close bracket + ONE space + open bracket + color + close bracket.
- Create a new product for each size and color, so if you have 3 colors and 5 sizes, you will having 1 generic product for the price and 15 "size and color" products to manage exactly your stock quantyties.
- If you like to have the sizes or the colors in a specific order, do not forget to input the products codes in the same order in EFY.
- You can use the following variables in the Thumbs to show automatically the available sizes and colours ([TxtDispo] [Sizes] [AllSizes] [Colors] [AllColors])
After this, try in the e-commerce to order a shoes.
If you click the order button, the system will automatically first asking to make your choise for the size and color.
Regarding the categories, if you like to use different parameters than 'Size' and 'Colors' for a specific category (for example 'Width' and 'Length') , you can specify them in the Name of the File->Categories :
Example for a category name 'Swimming Pool (Width)(Length)'
Important note : To create your different size and colors products, you can also using Excel to "copy and paste" your products and after use the Import function from excell into easyforyou (menu Tools->Import data from Excel)
- Using Sub categories.
In EasyForYou Menu File->Categories
a) Create a (mother) category: For example : Pets
b) Create (sub) categories: For example: Dogs, Cats, Birds.
For each sub-category, in the bottom field "Category mother E-Shop", select Pets
In EasyForYou Menu File->Products
Select the products you want and in the tab "Categories" select the sub-categories.
Important note : in the file initvar.inc you can set nSubCatScrollingMenu=1 to activate the dropdown menu to show automatically all the sub-category from a mother category if the even "mouse over" a mother category.
This script work only with ONE Sub-Category level. If you like to work with more than one Sub-Categories levels, you need to set nSubCatScrollingMenu=0
- Miscellaneous