Print this page File Document
Home Help


Demo 1

- Document management Order
 

Demo 4

- With "Easy For You", you only need 10 Clicks to create a new document.
Demo 5

- "Easy For You" allows codes bars management


   Getting Started - Fast encoding of a document
  • Click the tab in order to choose the type document that You wish to create.

    Orders=BC1
    Invoices=FT1
    Credit-Notes=NC1
    Price offers=OP1
    Etc…
  • Click on the search button to select a customer or supplier.

    (To imput a new customer, type his name in the field located on the left of the binoculars (search button) and validate with the Enter key from your keyboard. Then, click on YES for adding the customer. Input the data and to finish, validate the data of the customer with the F10 key or click the OK button)

    Click on the to generate the new document.
  • The focus goes automatically in the body of new document.
    Click on the button to select a product and press the ENTER key of your keyboard to confirm and pass to the following column.

    (To input a new product, type its Code in the column Code and press Enter on your keyboard to validate. Then, click on YES for adding the product. Input his data and to finish, validate by pressing the F10 key of the keyboard or click the OK button)
  • PS: If You want to add products in a document, a RIGHT click on the activates a search by secondary Code.
  • If needed, adapt the quantities, price...
    If You have the package STOCK CONTROL, the products quantities are automatically updated when you create invoices.
  • To add lines, click on the or DOWN arrow or F2 Key of the keyboard.
  • To finish: save the document by clicking on the or F10 key.
    For printing the document: click the or F7 key.

    IMPORTANT: Do not forget to use the RIGHT-click of your mouse to activate the contextual menus.
 
   Inventory Control
  • To add the products to your stock, to change this quantity, create a supplier Invoice or inventory document:

    1) Click the button "Purchase" of the File->Documents.

    2) Click the tab "Purchase" or "Inventory".

    3) Type "REG" like supplier (REG = supplier Code for the inventory).

    4) Click the button "+" to add a new document.

    5) If the product exist already in the File->Products, in the body of the document, simply type the product Code and quantity to be returned in stock in the body of the document.

    6) If the product does not exist, type the new Code in the body of the document, then type Enter and allow to "add new record", then return to the document and encode the quantity to be entered in stock.


    PS: Outgoing stock automatically accounted for by either the sales invoices, receipt, picking ticket or cash-register.

   Selections and filters
  • To browse All the documents of a ledger, double-click in the field "Customer"
    The documents post themselves by order of number (most recent above).
  • Functionality's of the CODE field: Input the Code of a customer or existing supplier then ENTER or To search: Type the first letters of a Code followed by * (wildcard) then press ENTER or type its VAT ID number then ENTER or
  • Click on the search button to select a customer or supplier then click on the button + or function F2 key to add a new document.

  • For posting All the documents of a ledger for only one customer, carry out a "Research customer" or double click the name of a customer posted in the grid of the documents.
  • Click the right button of your mouse on the search button to find the document by amount
  • Click the right button of your mouse to insert a new “out of sequence” document number
  • The selection cursor is used to filter the number of documents resulting from a query.
    PS: The smaller the value, the faster the search, however, the former documents will not be posted.


   Copy a document (Example: Order (BC1) to Invoice (FT1).
  • Select the documents to be copied, for example the open orders of a customer while clicking (+ CTRL) in the margin of the grid of the documents.
  • Click the right button in the menu "Copy-To", there You can choose the ledger towards which You will gather the selected documents (for example FT1 to copy to a new Invoice).
  • The copied Orders will be placed in statute "Closed".
    For each product in the document the stock" Quantity in Order" will be automatically updated.
   Using Packages (sets of products or text lines).
  • To create new Package:
    On the encoding of the products in a document, click the right button and choose "Save Package"
  • The whole of products and/or texts present in the document will be saved as a Package and can be restored (loaded) in another document.
  • To restore a Package:
    in case of the encoding of the products in a document insert a blank line, click the right button and choose "Load Package".
  • The whole of products and texts present in the Package will be recovered in the active document.
    For example, do not check "Price". In this case the active prices from the products will be taken by default.
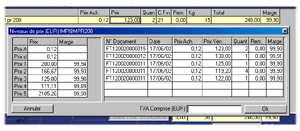
   Posting of the last prices.
  • In the body of a document, if the cursor arrives at the price level press F1.
    A window posts you then:
  • On left, the various prices in progress in the products
    At the right, the history of the sales for the active customer in the document and for the active product.
    Down field which allows the encoding of a price VAT-included.
  • You can click on one of the prices of left or one of the old prices of the history to restore it in the document.

   Add text to a document
  • During the encoding of the lines in the body of a document, click the right button and to choose the menu "Insert text", in the window type your text.
    PS: use the key "Insert" of the keyboard to insert blank lines.
  • You can save texts (complimentary closes etc?) by using the right button and the menu "Save Package".
  • To create new texts "type", use simply the body of a new document "OP1-Price-Offers".
    Type your text in the document body and click the right-button to choose "Save Package".

   Open or Closed documents
  • The "Closed" documents are for example:
    Invoices having printed or sent by e-mail.
    Orders having been copied towards one Invoice.
    See Files->Ledgers-> fields "Closed for..."
  • The open documents are All those which "Are not closed"! ;-)
  • For the encoding of a PAYMENT in a closed document, Click on the doc.number, after, click right and make your choice -> Payment Look also in Help Menu->F.A.Q. (Frequently Asked Questions)
  • To correct an error in an document, click the menu: Edit->Doc. Reopening (Necessary packages: EFYPAYMENT) PS: This operation is only possible with ADMINISTRATOR rights possible with a ADMINISTRATOR user type. See menu: File -> Users

   Change the layout
  • If you want to modify the layout of a document, go to menu :
    File->Company to insert a logo or modify the head of your document.
    See also the menu Tolls->Parameters->Printing.
    You can also using an HTML editor such as Front-Page or Dreamweaver . To edit the file LAYOUTMOD.HTM (copy from layout.htm) in your folder c:\Program Files\Easy For You - or with Vista -> C:\Users\USERNAME\AppData\Roaming\Easy For You.
  • Concerning the price-list, see option: EFYLAYOUT. If you are not familiar with an HTML editor, see option: EFYLAYOUT+EFYLAYOUT2

   Payment
  • The "Not paid" button gives you real time information concerning unpaid invoices and customers debit balance.
  • Usual type of payment for this customer or supplier.
    Notice: In a document, if the type of payment is encoded, the document is regarded as "already paid" and is no longer a part of the "Unpaid" documents.
  • For the encoding of a PAYMENT in a closed document, Click on the doc.number, after, click right and make your choice -> Payment Look also in Help Menu->F.A.Q. (Frequently Asked Questions)
  • To correct an error in an document, click the menu: Edit->Doc. Reopening (Necessary packages: EFYPAYMENT) PS: This operation is only possible with ADMINISTRATOR rights possible with a ADMINISTRATOR user type. See menu: File -> Users
  • Printing of the type of payment in a NOT paid document : to choose in the menu : File->Customer->Payment

   VAT code
  • The calculation of the VAT (sales tax) will be done according to the VAT ID code included in each line of a document.
  • When adding a product line in a document, if the currency of the document is the currency used by default in the Tools->Parameters->General->Currencies, the VAT ID code used by default will be the one used in the product form, The TaxID taken by default is the one present in the File->Product , in other cases, the VAT ID code taken by default will be the one present in the File->Currencies->VAT ID code.
  • When adding a new product in the File->Products, the VAT ID Code by default will be taken in the Tools->Parameters->Accountancy->VAT ID Code Sales and Purchases.

   Back-Order management


The Back-Order tab lists the OPEN orders of all customers (or suppliers for purchases)

BO=Back-Orders (orders that have not been delivered yet)

TO CREATE A PARTIAL DELIVERY :


  1. Under the back-order tab, select the specified customer by double-clicking the corresponding line of the document.
  2. For each product, enter the quantity to be delivered under the column "delivered" (the only column you can edit) and press the F10 key to validate the whole operation
  3. To generate the invoice corresponding to these products and to remove them from the inventory: click Code customer and then click the right button of your mouse and choose "copy to" invoice or picking ticket
Note :
  • Only the lines corresponding to a fill in delivery disappear from the table after invoicing.
  • The corresponding order is automatically closed when the total of the products have been delivered.
  • Printing or the pre-visualisation shows the quantity left to deliver

   The Cash-Register Tab and Menu List->Payment


This list makes possible to see the various payments or deposit from your invoices or tickets (only CLOSED) or orders (only OPEN).

This list is ordered according to the payment date a regroup by type of payment with a sub-total.
This list can also recapitulate the cash movements.

Example: to add the payment of an invoice in the Cash-Register:

- Click the Invoices tab.
- Click the right button of your mouse on the document number from the paid invoice.
- In the menu payment, select the type of payment.
- In the form, type the date and the Code of the payment.

From now, the information concerning the payment of this invoice is visible in the Cash-Register.
In the Cash-Register, click the button "Day Register" or "Monthly Register" to visualise the fill in list of your transactions.

The addition of lines in the Cash-Register relates ONLY cash (no other type of payments). At the beginning, the cash amount of the "Cash-Register" is set to zero and is indicated by the first line: "Cash of the day dd/mm/yy".

Each day, a new document is automatically added by the software and takes again the total cash from the previous day.

If invoices or orders are paid with cash, the following day, the first line of the new document is "Cash-Register of the day dd+1/mm/yy". This will take the total of the payments carried out with cash the day before.

Consequently, sometime, take time to taking away some cash. If not, your Cash-Register reach big amount.

Example: to carry out some cash:

- In your Tab Cash-Register, add a line such as in a usual document.
- Type the Code "REG." like a product Code.
- Replace the description of this line with, for example: "Taking cash away for the bank".
- Encode the amount and put the quantity to -1 (Negative = taking away, positive = deposits)

To daily maintain the cash total of your Cash-Register, you can, for example, input the various taking cash deposits or cash purchases like: "Cash away for restaurant" or "Cash for fuel for my car"…

Do not forget:
Purchases : Quantity = -1
Deposit : Quantity = 1